Friday, October 22, 2010

Tilapia Fish Tacos


Today after school, Scott told me that he was craving tacos (this is not news... that boy is always craving tacos).  I reminded him that I was on a diet and I'd rather not be tempted by eating at a Mexican restaurant, where I knew I'd order the wrong thing or overeat.  Besides, we just went grocery shopping and we have tons of food left over.  But he couldn't get the taco bug out of his brain, so I finally convinced him to make tacos at home.  I wasn't going to have any, but I went to the grocery store with him to get tortillas and ground beef, which is where I saw some fresh tilapia on sale.  I'm no dummy... I know that when fish goes on sale, that it's probably not as fresh as it could be, or that it is nearing its expiration date.  But I figured if I used it to make fish tacos today, it would probably be just fine.  And BOY am I glad I made the decision to buy it!


My favorite fish tacos are at Ragtime Cafe, where the fish is well-seasoned and topped with some home-made cole slaw, nothing else.  I didn't have any cole slaw or cabbage at home, but I could improvise.

I seasoned the tipalia filets with a spice blend I made that I thought best replicated their recipe: 1/2 teaspoon of each: cumin, cayenne pepper, garlic powder and chili powder, 1 1/2 teaspoons of no-salt seasoning, and a pinch of salt.  Then I got a small frying pan searing hot and cooked the filets about 1-2 minutes on each side (it doesn't take long to cook tilapia!).  I warmed up some 6" tortillas and shredded some romaine lettuce, which I tossed with just a smidge of my favorite salad dressing: Ken's Steakhouse Light Sweet Vidalia Onion.  That's all I needed... tortilla, fish, salad, and a squeeze of fresh lime.  They were almost exactly like my favorite tacos from Ragtime, but much cheaper and probably a lot healthier!  They clock in at just about 300 calories for two tacos, which was plenty enough to fill me up, and I was HONGRY.


I have some leftover tilapia, so I will probably make these again for lunch tomorrow... quick and easy!

Wednesday, October 20, 2010

Chicken and Roasted Broccoli Alfredo

If you're the sort of person to see the word "alfredo" and click away immediately, before the mere thought of a cream-based sauce widens your hips, fear not!  Today, I have made the impossible possible!  What I have for you here is a rich, creamy, hearty, flavorful pasta casserole that will fill you up while actually trimming you down! Never again will you brave your grocer's freezer aisle in search of measly frozen dinners because you want pasta but can't afford the calories of a home-made dish!  Folks, this casserole clocks in at under 300 calories per serving, and the serving size is more than enough to fill you up.  Behold, the miracle secret-weight-loss pasta:


The best part is, I didn't use any "fake" low-calorie ingredients to make this.  No fat-free cheese, no reduced-calorie alfredo sauce, no low-carb pasta... everything is full-fat and boyfriend-friendly.  Let us begin!

To start, I seasoned some broccoli florets with my trusty no-salt seasoning blend, using non-stick cooking spray instead of oil to get the spice to adhere.  I popped the broc in an oven set to 400 degrees to roast while I got the rest of the ingredients ready.


 In a large pot, I boiled half a box of Ronzelli Whole-Grain penne pasta until al dente.  In a large (large!) skillet, I cooked one yellow onion, cut into large chunks, with some more of the miracle non-stick spray.  When they were cooked til just tender, I added a whole container of pre-sliced, pre-washed baby portabello mushrooms.


Once the mushrooms were tender, I added two cups of shredded chicken that I had left over from last night's dinner (rotisserie chicken works great, or any sort of pre-cooked chicken you may have on hand) along with a generous sprinkling of my favorite chicken seasoning.


At this point, my broccoli was ready (fork-tender, but still packing a bite), so I added it to the pan, too.  When the chicken was warmed through, I added my alfredo sauce.  To tell the truth, I haven't cooked or eaten anything having to do with alfredo in years, simply because I'm scared of the calories.  But I saw this at the grocery store and was actually amazed at how "light" it was, despite not having any sort of "low-calorie" labeling.


Once the sauce was warmed through, I realized I didn't have enough sauce for all the stuff I was cooking, and there was still quite a bit of sauce sticking to the sides of the jar.  I poured in about half a cup of milk (I used 2%), closed the lid, and shook the jar to thin out the remaining sauce and poured the whole thing into my skillet, stirring to combine.


By this time, my pasta was done, so I drained and rinsed it, and mixed it with my other ingredients, and poured the whole shebang into a large casserole dish.


I topped the casserole with one cup of shredded mixed Italian cheese (mozzarella, parmesan, asiago, romano, and god-knows-what-else) and another heavy sprinkling of my no-salt seasoning.


The oven was still set to 400 degrees, so I popped the dish in for about ten minutes, and it came out looking like this:


Amazing!  Truthfully, no one will ever know how healthy this is.  The whole wheat pasta was better than most I have tried, and in a blind taste test, you'd never know it wasn't the evil white stuff.  There wasn't very much sauce, but it honestly didn't need any more than it had.  The seasoning blend plus the cheese added more than enough flavor, and my favorite part was the roasted broccoli... really something amazing!


This makes seven servings, so it would be a great family dinner (just add a side salad and you're done), but if you're just cooking for two, like I am, it makes for great leftovers for the rest of the week.  Hope you enjoy it, folks... this may be my very favorite recipe here on Kelly's Noms, so give it a try and let me know what you think!

Tuesday, October 19, 2010

Waffle House at Home

Last night (maybe after a beer or two), Scott really wanted to go to Waffle House.  Being on a diet, I could not have been less pleased with this, as I have no restraint when it comes the ol' WH.  I get the same thing every time: a cheesesteak melt with hash browns covered and smothered.  NOT good for the hips, my friend.  We came to a compromise... we snacked on healthy munchies at home (pickles, string cheese, and celery) and I promised to make him a Waffle House breakfast in the morning.


It has been years since I have attempted to make hash browns from scratch, but I remembered them being fairly easy to pull off, if a bit difficult to perfect.  The trick is to squeeze as much water from the potatoes as possible (did you know potatoes were so full of water? It's amazing!).

I started with two smallish Russet potatoes and half a yellow onion.  I shredded the potatoes and onion using my box grater over a tea towel lined with three layers of paper towels and lightly salted them.  I wrapped them up and wrung them out over the sink (it's fun to watch the tea towel turn purple... don't use a good one!) until I couldn't squeeze out any more water, then I swapped out the paper towels with three layers of fresh ones and squeezed again.  Meanwhile, I heated up a large skillet with a half-and-half blend of olive oil and butter.  When the butter had begun to brown and was sizzling, I spread out my potatoes and onions into a single, 1/2-inch layer in the pan and added more salt and some freshly ground black pepper.  I packed them down with a spatula and left them alone... if you move them, they won't get brown!


After about 5 minutes, the hash browns were ready to flip.  I  covered the hash browns with a large dinner plate, and flipped the pan so the hash browns were inverted into the plate, then I added a little more oil and butter to the pan and slid the hash browns back in, to cook for another 5 minutes.

A little burned, but it's okay... more flavor!

Meanwhile, I scrambled up some eggs, toasted some bread, and shredded some sharp cheddar cheese.  When the eggs were nearly set, I turned off the heat and covered them with shredded cheese to melt while the toast was finishing.  By the time the toast was done, the cheese was melted and the hash browns were a nice golden brown on both sides, and ready to serve!

I added a little mayo to the toast (just a teeny smear will work wonders) and made open-face sandwiches with the scrambled eggs, and topped the hash browns with a little more shredded cheddar (smothered and covered, just like I like them!).

Cheddar makes it better!

The hash browns were very nice and crispy, and had great flavor, but they were a little greasy.  Next time I think I would use less oil in the pan, and let the pan get a little hotter before I add the potatoes.  The cooler the pan is, the more grease your food will absorb.  Overall, though, I am quite pleased with how they turned out, especially since I haven't made them in forever.  Total cook time, including prep, was about 15 minutes, so it's really not as time-consuming as one would imagine.  And Scott, who has always been very critical of my scrambled eggs, said these were absolutely perfect!  (The trick is to let the beaten eggs sit in the pan for a few seconds before starting to scramble them)

So the next time you are craving Waffle House, save yourself some money and calories and just make your breakfast at home!

Friday, October 15, 2010

Insanely Healthy Chili

So, as some of you may know, I have been watching my calories and my nutrition levels, trying to lose some weight and get healthier.  AND, fall is here in full swing, which means fall foods, which are some of my favorite foods of all!  Chili is probably my favorite one-dish meal, no matter what time of year, but chili can often be very high in sodium and calories, depending on how you make it, and what you top it with.

Pretty?  No.  Healthy?  YES!

Well, after playing around with some recipe analyzers online, I came up with the perfect chili recipe that is absolutely packed with great vitamins and minerals, while keeping the calories and sodium very low.  This chili provides more than 100% of your Vitamin A and Vitamin C needs for the day, as well as nearly 40% of each protein and fiber.  Plus, it doesn't taste like cardboard!

Notice the large serving size... you may not eat that much!

I didn't take any method shots of this one, mostly because chili is a very, very ugly thing, and I don't have the photography skills to make it look any better, but you'll have to trust me that this chili is amazing.  Okay, it might not be the best chili I've ever had (made with sirloin tips and topped with a mountain of shredded cheddar and sour cream), but as far as "health food" goes, it's up there.

Ingredients
1 lb ground turkey (I used 85/15, but you can use breast meat if you want to cut even more calories)
2 yellow onions
2 medium sweet potatoes, washed and cubed
1/2 a medium butternut squash, peeled and cubed
1 large can diced tomatoes (by "large" I mean bigger than a Rotel-sized can)
2 cups chicken stock OR water OR lager (keeping in mind that lager ups the calories)
1 tbsp cumin
1 tsp paprika
1/2 tsp cinnamon (or 1 cinnamon stick)
1 tsp cayenne chili powder
2 chipotle peppers in adobo sauce, chopped (SERIOUSLY spicy. Omit these if you can't take the heat)
1 cup edamame (I used frozen)
1 cup corn (again, frozen)
1/2 cup black beans
8 cloves garlic, finely minced

Method
In a large stock pot, brown the turkey until cooked through, remove from pot and drain.
Add onions and a little bit of cooking oil to the pot and cook til soft, about 5-7 minutes.  Add spices and garlic and cook another 1-2 minutes.
Add diced tomatoes and liquid (stock, water, or beer) and bring to a boil.  Once boiling, reduce heat and return turkey to the pot, cover, and simmer for 30 minutes.
Add sweet potatoes and butternut squash and simmer for another 30-45 minutes, covered, or until sweet potatoes are tender.  I discovered this by accident, but you'll know it's right when the squash seems to have disappeared from the pot.  It cooks faster than the sweet potatoes, and will melt right in with the liquid, thickening the chili.
Add frozen veg and beans and crank up the heat to medium-high and let bubble away for another 5-10 minutes, uncovered, until everything is nice and hot and the chili has thickened.

That's it!  It was crazy spicy, so I added a dollop of fat-free sour cream (you could also use yogurt or ranch dressing) to calm it down a bit.  A small bowl is more than enough, as all the veggies make it super filling.  I haven't measured, but this recipe assumes 8 servings, though I may get even more out of it.  The nutrition facts are applicable to a 2-cup serving, so you might get closer to 10-12 servings.  I will be eating chili all week long... welcome, fall!

Wednesday, October 13, 2010

I Met Alton Brown!

Alton Brown (of Good Eats and Iron Chef America fame) is my hero.  I watch re-runs of his shows nearly every day, and have attempted his recipes too many times to count.  So imagine my excitement when I found out he was going to be IN MY CITY to do a book signing promoting Good Eats 2: The Middle Years


I got to the bookstore an hour early, thinking that would be enough to get a good place in line.  What I didn't know was that they had been handing out tickets to hold your place in line since 5pm YESTERDAY.  Oh noes. So, an hour early, I got number 187.  One hundred and eighty-seven.  This calls for drinks.  Scott and I headed over to Brio, across the street, for some wine and apps to kill time.  We stayed until 7, then headed back to the bookstore, as an associate had warned us that the line would move quickly.


Well, I'll be darned... we walked right into a Q&A session in full swing!  Alton, perched upon a counter, was answering questions from the crowd, and it just so happened that on our way up the escalator, we found ourselves smack dab in the front row, with a perfect vantage point.  Alton was talking to meeeee!  (Yes, I turn into a giddy schoolgirl when even thinking about AB)


For those who don't know, Alton Brown is from Georgia, so he had much love for us Southern folks and our "unique" culinary style.  I caught some footage on my aging camera, but got tired of holding my arm up for too long, so unfortunately, I didn't capture the scene I really wanted.


I was trying with all my might to think of a really good question for my hero... there were many questions from little kids that were cute but boring ("What is your favorite vegetable?" came up twice... in a row.  It's brussels sprouts, by the way.) and many from the adults were the expected bunch ("Where did you go to school?" - Georgia State.  "What is your favorite episode of Good Eats?" - An upcoming episode about oatmeal.)  Inspired by my favorite Alton Brown dish, his Pad Thai, I thought I would ask, "What is your favorite ethnic cuisine?", and shot up my hand.  Being in the front row, I was the next person called, and as soon as he pointed at me, I somehow blurted out, "What is something that you love to eat, but hate to cook?".  And guess what?  He said it was the first time anyone had ever asked him that question.  Ever?? This guy is interviewed thousands of times a day! (Slight exaggeration)  I could not have been more pleased with myself.  His answer, by the way?  Chicken and dumplings.  He said he loves it when his mother in law makes it, but he doesn't like to make it himself -- not because it's hard, he just... doesn't like it.  (Totally wish I had filmed that)

Waiting in line

Anyway, we waited for another hour or so before we were finally called to get in line.  I don't know how many numbers were handed out, but 187 was pretty far back.  When we finally got near the front, a bookstore employee handed us a post-it note where we could write down exactly what we wanted our inscription to say.  I picked "To Kelly and Scott", simple enough.  Next, we winded around to his assistant, who also plays one of the ever-present lawyers on Good Eats.  He checked to make sure our book was opened to the right place and sent us over to another bookstore employee, who took my camera for our photo op.

"Hey, I want some tequila, too!"
When we got to Alton, an employee was asking him if he wanted any more water, or a coffee or anything, and Alton said something about wishing they had some tequila.  When he called us up, I said, "Hey, if there's tequila, we're sticking around!"  (Okay, not exactly the wittiest thing to say to my hero, but good enough)

Tequila!
He signed our book, took a couple of pictures, shook our hands, and we were gone.  All in all, we were at the bookstore for three hours, and it was worth every minute!  Keep your eyes peeled for the next season of Good Eats!


Friday, October 8, 2010

Simple Sandwiches

Today, over lunch with Scott, I decided that I prefer simple sandwiches, with few ingredients, over more complicated, fussy, and gourmet sandwiches.  I mean sure, muffaletas and cheesesteaks are great, but what truly makes me happy is something I can put together in less than five minutes, with ingredients I always have on hand in the fridge.

The sandwich that inspired this revelation is the one I had today: Jerk turkey breast (made by Boar's Head... it's very spicy, so if you want less heat, I'd go with just regular turkey), sliced avocados, mayo, and salsa on toasted whole wheat bread.  No cheese, no tomatoes or lettuce, just two fillers, two condiments, and bread.  Perfect!  The avocado adds creaminess to replace cheese (and while it is quite fatty, it's good-fat and your body loves it) and the salsa added a nice tomato flavor plus a kick of heat without adding to the bulk of the sandwich.

Some of my other favorite sandwiches are just as simple:

Marmite and sharp cheddar on a baguette

Hummus and cucumbers on pita

And of course, the tried and true PB&J, but as Liz Lemon (aka Tina Fey on 30Rock) once said, you gotta add potato chips.  Potato chips MAKE a PB&J!

I also like to add French's fried onions to tuna salad for a little crunch.  Okay, the potato chips and fried onions certainly won't up the health-factor of your sandwich, but sometimes you just have to add a little "happy" to your sandwich.  4 of 5 chips on a sandwich is better than a handful on the side!

What is your favorite simple sandwich?  Or do you prefer a piled-high dagwood style sandwich?

Wednesday, October 6, 2010

Spiced Pork Tenderloin with Roasted Veg

So I've had this pork tenderloin in the fridge for almost a week, and tonight was probably the only time I ever would have had to make a proper dinner.  Between work, school, and moving apartments, I've spent too much time and money eating out or just eating crap instead of actually cooking.  So tonight at around 8:30, I decided I was hungry, remembered the pork loin, and immediately started to freak out because I didn't think I had time to cook it properly.

Wrong I was.

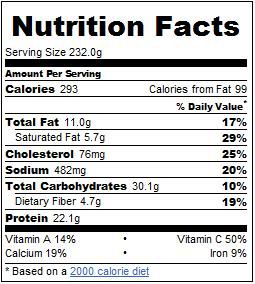
This pork loin tastes like you've been marinating it for hours, but it takes only about 40 minutes to cook, from start to finish.  The secret is in the spice, a thick rub that seals in the juices, flavors the meat, and magically transforms into a juicy sauce in the oven, perfect for drizzling.

I started by trimming the pork loin.  The tenderloin that I bought was a little over 2 lbs, but when I took it out of the plastic wrap, I found that the butcher had cut it in half down the middle, so I actually had two 1-lb loins.  Bummer.  But no worries, I just wrapped one of them up (after trimming the fat and silverskin) and popped it in the freezer for later.  I knew I wouldn't have leftovers, but I didn't really want to microwave a perfectly cooked pork loin the next day, either.


Next, I made the rub.  I've said it before, and I'll say it again... I don't like recipes.  Especially for spice rubs.  For this one, I just opened my well-stocked spice cabinet and grabbed a little of this and a little of that.  I ended up using a teaspoon of each: sea salt, minced onion, garlic powder, garam masala, cumin, and paprika. I also have this badass spice grinder that I found in a discount store... it's Chinese Five-Spice, which is one of my favorite seasonings, but all the components are whole, so you can freshly grind as much as you need, when you need it.  I ground a little of this into my spice mix (I didn't measure, I just grinded until my elbow was sore) and mixed up the whole shebang.  I will say this: when experimenting with a spice blend, it can't hurt to taste a little bit on a wet fingertip.  You know when you finish a bag of potato chips and you stick your finger into the corner to get the last of the seasoning?  It will taste like that, a little potent, but not unpalatable.  If it tastes like you'd like to have it on potato chips, you've made it right.

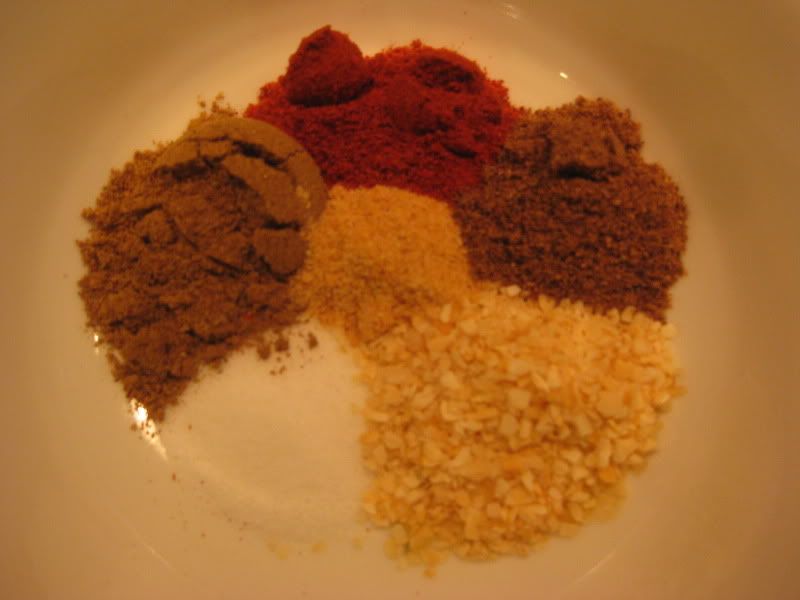
Clockwise from the salt: cumin, paprika, garam masala, minced onion, and garlic

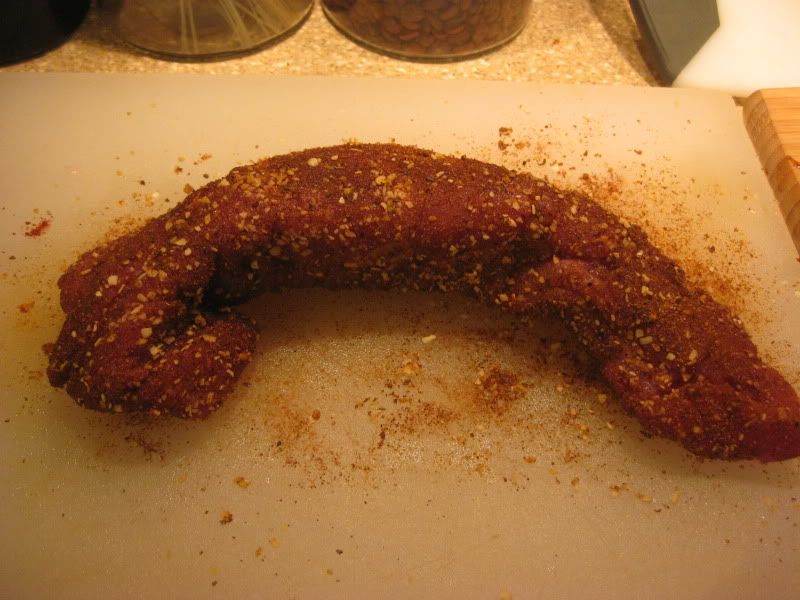
I rubbed the pork loin with some olive oil (roll up your sleeves and really massage that baby) and sprinkled all sides with my spice rub, patting it in and making sure the loin was totally covered, with no meat showing through.


I wanted to get a good sear in a pan first, to seal in the juices, so I lubed up a large skillet at high heat and I cooked the loin for 2 minutes on each side (there being 4 sides and not only 2... we are working in 3-D, people).
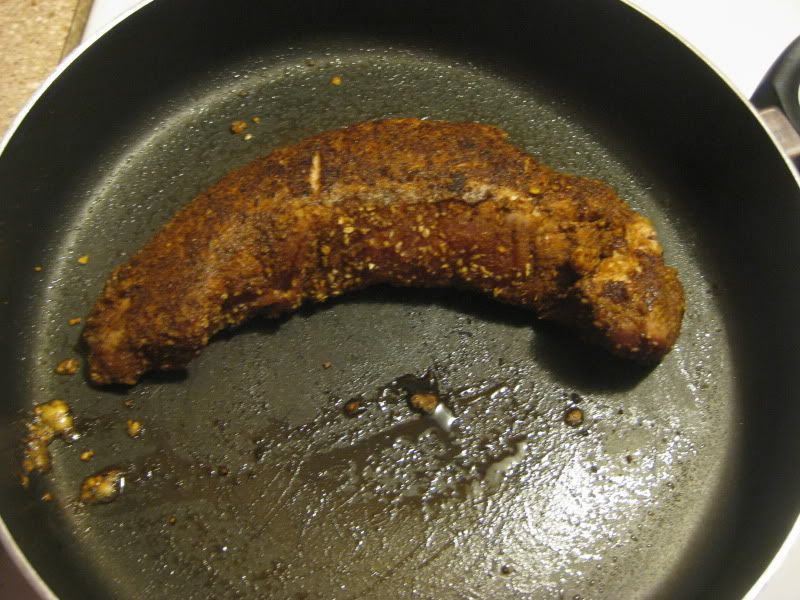
Nice and crusty

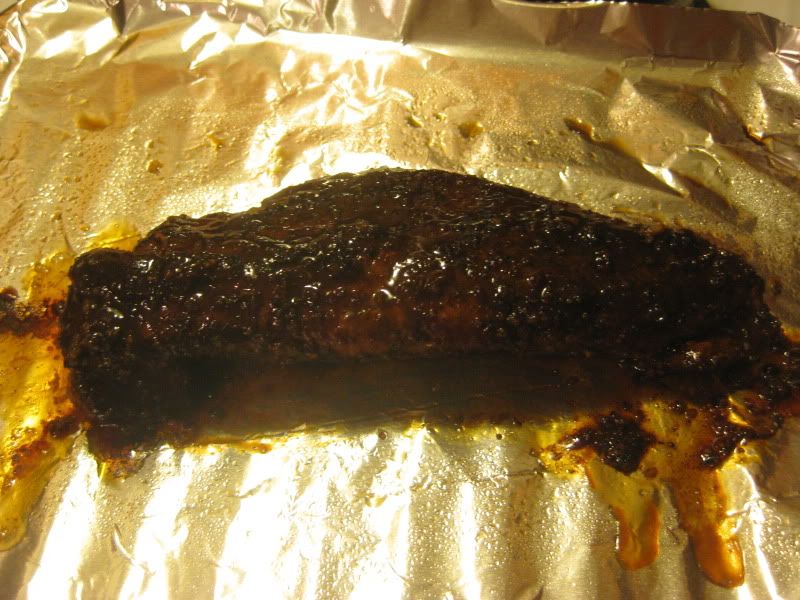
Next, I placed the loin on a foil-lined roasting pan and roasted at 450 degrees for about 15 minutes, or until the temperature reads 155 degrees on a meat thermometer.  (Really, folks, I feel like the food police will come and get me if I say this, but I only cooked mine to 130 degrees.  I don't want to hear anything about what temperature meat should be cooked to, because no matter what, I believe that it's better to undercook than overcook anything.  And that includes poultry.  But if you like rubber pork, go ahead and cook it to 155.)


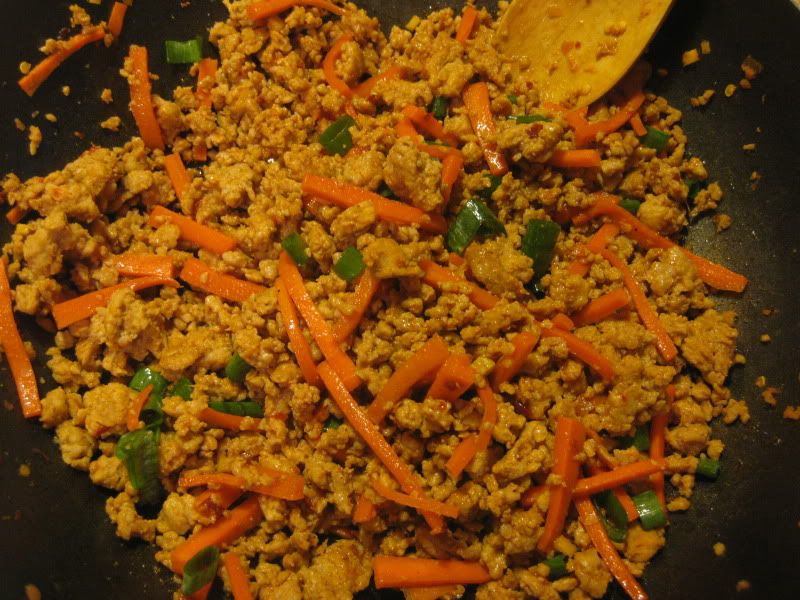
Meanwhile, I sliced up some butternut squash and cut some cauliflower florets (okay, I did the prep yesterday, but I won't count that extra time), tossed them with some olive oil and leftover spice blend, and spread them out in a single layer on a baking sheet.  The pork and the veg go in the oven at the same time.  When the pork was done, I left the veggies in the oven and pulled the pork loin out of the oven, and basted it.  Basted.

Baste:  Did I ever tell you that I make my own chicken broth?  Well, I do.  All the time.  Every time I cook a chicken in the crock pot, I always return the skin and bones to the pot and add about 5 cups of water.  I cook that baby on high for about 8-10 hours, or until the bones are bleached, strain it, and freeze it in ice cube trays.  I use that broth to make soup, rice, mashed potatoes, what have you.  I also use it to baste pork.

Take about 20 broth-ice-cubes and throw them in your skillet, the one you cooked the pork in.  You should have left it on high.  Whisk that melted broth for about 10 minutes on high, and you should have a gorgeous reduced fake semi glace.  It's too strong to use as a sauce at this point, but it can be used to....


Baste.  Baste and cover immediately with tin foil and set aside to rest for 10 minutes.  While your pork rests, your veggies begin to caramelize (which is a magic moment), and by the time the pork is cool enough to touch (but just!), your veggies are ready to pull out of the oven.  Slice the pork loin into medallions and top with sauce from the bottom of the foil pouch.  Serve while veggies are piping hot.

When the cauliflower is nice and brown, it's done

I served this to my boyfriend, our roommate, and a friend of ours, and every last bite was devoured gleefully within seconds.  The pork was unbelievably moist and juicy, and the flavor was out of this world... nothing like so many bland pork loins I've had previously.  The roasted veggies, seasoning with the same as I used to spice the pork, complemented the meat perfectly, and were creamy and crispy at the same time... like roasted marshmallows!  (If marshmallows were good for you)

Anyway, now I'm totally excited about that leftover loin that I froze... I might make this tomorrow.  Or tonight, while sleepwalking.  Because this pork is dreamy.

Tuesday, September 21, 2010

Kimchi Spring Roll - FAIL!

Yes, this was a fail.  So why am I still blogging about it?  Because the flavors were all there... sesame oil, kimchi, chili paste, fish sauce, etc... there was just a massive execution mishap.  I will tell you exactly how I made these in the hopes that you can learn from my mistake and never make spring rolls this way, ever.  I'll also tell you how I would do it next time, so hopefully there is still a salvageable recipe buried in here somewhere.
Fail.

To be honest, these might have turned out okay if I had changed just one little ingredient: the wrapper.  I sent Scott off to the Asian market today to pick up supplies, and I even provided him with a shopping list.  My error was that I did not make a detailed enough list for him.  When I asked for spring roll wrappers, I meant for him to get the kind that are flour-based, square, and either refrigerated or frozen.  I can't possibly blame him, because what he brought home was clearly marked "Spring Roll Wrappers", only they were Vietnamese-style rice paper wrappers.


Totally different.  I figured I could either run down to the grocery store (the Asian market is too far away for a last minute trip) and pick up some phyllo dough, or I could just see what happens with the rice paper.  I hate, hate, hate phyllo dough (to cook with, not to eat... that stuff is delicious), so we decided we would just figure out how to work with the rice paper.

Sort of see-through... weeeird!

From there, I just made everything as normal.  I browned some ground pork in a skillet with some sesame oil, minced ginger, and julienned carrots (I use the terms "minced" and "julienned" loosely, as my knife skills are sorely lacking) marinated in a blend of soy sauce, mirin, fish sauce, brown sugar, and chili-garlic paste.


 A word on fish sauce, for those who have never cooked with it before: the flavor is essential to most Asian dishes, so you really can't substitute.  It's typically made from anchovies, water, and sometimes some salt and sugar.  It tastes delicious.  I promise.  Here's the thing, though... when you open up the bottle and take a whiff, it straight up smells like sweaty underwear.  It is a most pungent, unpleasant, and gag-inducing aroma, but please don't let that deter you.  Something magical happens when you cook with it, and it makes all Asian food taste like manna from heaven.  Strange but true.

My first time working with actual ginger. True story.

Meanwhile, I chopped up some kimchi that Scott also picked up from the Asian market.  By the way, this kimchi was made fresh just for us... all the store had were giant, restaurant-sized jars of kimchi, so when Scott asked if they had anything smaller, the shopkeeper told him, "Fifteen minute!  You shop!", and before Scott had gathered everything from my list, the guy presented him with a half-gallon sized jar of freshly-made kimchi.  Nice!

A hot mess of chopped kimchi.

Now to deal with these rice paper wrappers... I filled a bowl with some hot water and wrapped a cutting board with a wet kitchen towel.  I had all my fillers at the ready, and I had my oven pre-heating to 425 degrees.  I also had a small bowl with equal amounts of sesame and canola oil to brush over the spring rolls, to prevent them from getting too crunchy in the oven.

Sesame oil is one of my favorite smells

One at a time, I dipped a sheet of rice paper in the hot water for about 5 seconds, then laid it out on my cutting board.  I placed a tablespoon of the pork mixture and a tablespoon of kimchi in the center of each one, then rolled them up like a taco.  It was fast and easy work, and in about 5 minutes, I had made 8 of them and was ready to be done.  I had originally planned to made a whole bunch of spring rolls for freezing, but I didn't think these would turn out well, so I stopped at a dinner-for-two sized amount.

You can only barely see the wrapper in this shot


After brushing them lightly with oil, I baked them for about 10-15 minutes, until they were getting brown on top and the fillings were starting to think about oozing out, and let them cool until they were almost at room temperature.  (Trust me, I tried digging in when they were cool to the touch, and the steam that came out of the spring roll nearly burned off my face)  I served them with the Pioneer Woman's sesame noodles, topped the whole thing with some spring onions, and grumbled through my whole meal.


Okay, next time, I would do things exactly the same way, except that I would use flour-based wrappers instead of rice paper.  Don't get me wrong, the rice paper is good, but it's meant to make summer rolls, chilled or room-temperature rolls filled with vegetables.  It just didn't work for this kind of filling.  I do have a lot of pork and kimchi left over, so I will be making fried rice sometime in the near future.  All in all, dinner wasn't terrible, and Scott even said it was good, but it's not something I would ever serve to guests.

Friday, September 17, 2010

It's Diet Time, Folks

As I've been writing this blog, I've been much more focused on foods that taste good and are relatively easy to make, but I haven't paid much attention to nutrition and calorie content.  That needs to change.  Since I've been writing this blog, I've gained weight, and so has Scott, and with our upcoming vacation in December (Cape Town, South Africa!!!), we need to start paying more attention to what we eat.

All recipes in the future (okay, not all, but most) will have nutrition information included, and I will try to make everything much healthier than I have in the past.  That said, I will not sacrifice flavor.  I believe that food should be something pleasurable, and even if you're on a diet, you should be able to enjoy your meals.  There will be no poached-chicken-and-steamed-broccoli meals on this site, ever.  In fact, I am going to try to make all the stuff I would normally make, but find creative ways to cut the calories and boost the nutrients wherever possible.

So if you enjoy my blog for all the yummy recipes, but you don't need to lose any weight (I am looking at YOU, Crystal!), still come by and check it out, and I'm sure my recipes will cater to you skinny-minnies as well as we curvaceous more-to-love folks as well!

Thursday, September 16, 2010

Tuna Melt Quesadillas

The title of this post alone is enough to make post readers turn away and never come back... but wait!  I promise I have delicious noms in store for you!  In fact, I had to make Scott wait in the other room while I was making these, because I knew that if he found out I was putting tuna in quesadillas, he'd never eat it.  Well, he ate it, and when I asked him to rate his dinner on a scale of 1 to 5, 1 being totally grody and 5 being super awesome good, he gave it a 10.5.  Which is a good thing, since this was such a cheap-o meal, I can make it over and over again.


Let it be known that I do not like tuna melts.  I also don't much like tuna noodle casserole, or any other combination of foods where the tuna is hot and mixed with cheese.  But for some strange reason, I have always loved tuna quesadillas, and I think it might just be because my love for quesadillas trumps my hatred of hot tuna. For this recipe, we will do all we can to hide the flavor of the tuna, and mask its fishiness.

See that tuna quesadilla? Not as good as mine.

I start by mixing one pouch of Starkist hickory flavor tuna (or whatever flavor you like... those things are awesome!) and one can of diced mild green chiles.  Sure, you can dice your own mild green chiles, but for this dish, I like the canned variety because they're nice and soft and I can't be bothered to cook them down from fresh.  For the flavoring, I'll add a dash of sriracha, some leftover meatloaf glaze, and some salt and pepper.


Then I start my quesadillas... some butter in a frying pan on medium-high heat, add a tortilla, add some cheese, add my tuna mix, some more cheese, another tortilla, and done!  Let it sit undisturbed until the cheese on the bottom half is melted, then flip with a wide spatula and cook on the other side until all the cheese is melted and the tortillas are nicely browned.


While the quesadillas were cooking, I mashed up half a ripe avocado with some spicy ranch dressing and a little salt, for a creamy dipping sauce.  Slice the quesadillas up and serve with a simple salad: a wedge of iceberg lettuce drizzled with some more spicy ranch dressing.

One of my favorite foods... behold the Delicious Avocado!

I promise, even if you don't like hot tuna or tuna melts, you will love this dish!  And it's so simple and inexpensive, it's a perfect weeknight meal, and a great meal to make if you're only cooking for one or two people!